Wednesday, May 27, 2015
Friday, November 2, 2012
Capture data as a service (linkedin databus)
- a fetcher which extracts changes from the data source or another Databus component,
- a log store which caches this change stream,
- a snapshot store which stores a moving snapshot of the stream, and
- a subscription client which pulls change events seamlessly across the various components and surfaces them up to the application.

2.Oracle Adapter
To get around this problem, we add a regular column scn to the table and create an index on the column. The default value of scn is set to in nity. After commit, the ora rowscn for the a ected rows is set. Every so often, we run a statement to update the scn column.
update T set scn = ora_rowscn
where scn = infinity;
The query to select the changed rows since lastScn now becomes
select * from T
where scn > lastScn
AND ora_rowscn > lastScn;

3.MySQL Adapter

4.The Bad
1. Databus sources in the form of complex join views are expensive because they have to be evaluated at fetch time.
2. Large BLOBs and CLOBs in rows can incur additional disk seeks.
3. The TxLog table grows over time which aff ects performance. Without time-based partitioning of the table, truncation of older rows requires maintenance with a period of write unavailability for the primary database.
4. Very high update rate can cause increased load on the SCN update job; this a ffects the effectiveness of the indexes on the TxLog table.
5. Very high write tra ffic can also lead to increased read and write contention on the TxLog table.
Wednesday, December 21, 2011
How Twitter Stores 250 Million Tweets a Day Using MySQL
Twitter's new tweet store:
When you tweet it's stored in an internal system called T-bird, which is built on top of Gizzard. Secondary indexes are stored in a separate system called T-flock, which is also Gizzard based.
Unique IDs for each tweet are generated by Snowflake, which can be more evenly sharded across a cluster. FlockDB is used for ID to ID mapping, storing the relationships between IDs (uses Gizzard).
Gizzard is Twitter's distributed data storage framework built on top of MySQL (InnoDB).
InnoDB was chosen because it doesn't corrupt data. Gizzard us just a datastore. Data is fed in and you get it back out again.
To get higher performance on individual nodes a lot of features like binary logs and replication are turned off. Gizzard handles sharding, replicating N copes of the data, and job scheduling.
Gizzard is used as a building block for other storage systems at Twitter.
Thursday, November 10, 2011
Database Sharding Strategies
For many applications, it is appropriate to shard based on a shard key such as a User ID. Using a modulus of a numeric ID, especially an auto increment primary key, ensures even distribution of data between shards.
Shard by Date/Time Range:
For time-based data such as feeds or blogs where data is accumulating over time, it may make sense to shard by date range. For example, each shard could contain data for a single month. New shards can be added each month and old shards can be dropped once historic data is no longer needed.
Master Lookup:
It is sometimes a requirement to control the sharding manually or in an application specific manner. One example would be a requirement to host key customer accounts on shards hosted on higher specification hardware. To support this requirement, a master shard can be created which contains lookup tables to map customer IDs to a specific shard number.
Session-based Sharding:
Some categories of application, particularly user-centric web applications, can choose a shard when a customer logs in and then direct all queries to the same shard for the duration of that user session.
Fixed Shard:
mapping tables to specific fixed shards.
Global Tables:
Global tables are tables which are hosted in all shards and data is automatically replicated across all shards. The benefit is that these tables can be used in joins with sharded tables in each shard. Global tables are typically fairly static tables or with low write volume, such as product codes, countries, and other reference data.
Custom Sharding:
allows developers to control all sharding behavior by providing code-level integration or through the use of shard hints, which are comments that can be placed within a SQL statement to instruct the driver to use a particular shard for a query.
(Reprint posts: from http://www.dbshards.com/dbshards/database-sharding-strategies/)
Thursday, June 16, 2011
应用层针对数据切片的实现方法
在详细描述之前,我们需要定义以下两件事:
(1)定义sharding的方式,设定我们需要sharding模式是通过SQL方式访问数据库。
(2)定义SQL访问时sharding的精细度,即需要SQL解析的模式还是简单的数据源绑定模式,不同的实现方式其实现复杂度也完全不一样。
接下来我们开始详细讲解数据源绑定模式和SQL解析模式的具体实现方法。
假设我们有用户信息2000万或者更多,随着业务的增长我们需要根据userid将此sharding, 数据源绑定的模式是如何实现的?
第一步,定义数据库的sharding方式,将数据库通过schema方式切分开来,简单SQL代码如下。
SQL代码如下:
create database user00;
create database user01;
...
create database user09;
第二步,将10个schema分布到不通的物理机器上,并创建相同的表,表的个数一定为10份。
machine1:
user00~user02:
create table user
(
userid bigint (12),
email varchar(256),
........
)
machine2:
user03~user05:
create table user
(
userid bigint (12),
email varchar(256),
........
)
machine3:
user06~user09:
create table user
(
userid bigint (12),
email varchar(256),
........
)
第三步,定义数据源与具体逻辑数据库的关系,简单的XML配置代码如下:
<datasource-config>
<datasource name="user00" value="0">
<property name="driver" value="com.mysql.jdbc.Driver"/>
<property name="url" value="jdbc:mysql://10.224.57.116:3306/user00"/>
<property name="user" value="test"/>
<property name="password" value="pass"/>
</datasource>
...
<datasource name="user03" value="3">
<property name="driver" value="com.mysql.jdbc.Driver"/>
<property name="url" value="jdbc:mysql://10.224.57.117:3306/user03"/>
<property name="user" value="test"/>
<property name="password" value="pass"/>
</datasource>
...
<datasource name="user06" value="6">
<property name="driver" value="com.mysql.jdbc.Driver"/>
<property name="url" value="jdbc:mysql://10.224.57.118:3306/user06"/>
<property name="user" value="test"/>
<property name="password" value="pass"/>
</datasource>
...
</datasource-config>
第四步,根据传入的USERID,进行数据源的选择,代码逻辑如下:
(1)插入数据:
SQL语句为: insert into user(userid,email) values(1,'aa@sina.com');
插入逻辑:根据userid的value=1进行取模10的值=1,知道此时插入的数据源为user01,根据数据源打开数据库,插入数据。
(2)查询数据:
SQL语句为: select * from user where userid=12;
查询逻辑:根据userid的value=1进行取模10的值=2,知道此时查询的数据源为user02,根据数据源打开数据库,获取查询数据。
总结:数据源绑定模式相对比较粗犷,实现方式非常简单,拆分的数量与数据源的配置数量成正比,将数据源与传入的值进行绑定, sharding的精细度只能到schema级别,使用的SQL语句一定是固定的,可改造ibatis的数据源注入情况,达到ibatis的下应用的sharding。
依然假设我们有用户信息2000万或者更多,随着业务的增长我们需要根据userid将此sharding, SQL解析的模式是如何实现的?
第一步,定义数据库的shading方式,将数据库通过schema和表的方式切分开来,将6个schema分布到不通的物理机器上,并创建不同命名的表,表的个数是6*10=60。
machine1:
user00:
create table user00
(
userid bigint (12),
email varchar(256),
........
)
......
create table user09
(
userid bigint (12),
email varchar(256),
........
)
user01:
create table user10
(
userid bigint (12),
email varchar(256),
........
)
.....
create table user19
(
userid bigint (12),
email varchar(256),
........
)
machine2:
user02:
create table user20
(
userid bigint (12),
email varchar(256),
........
)
.....
create table user29
(
userid bigint (12),
email varchar(256),
........
)
user03:
create table user30
(
userid bigint (12),
email varchar(256),
........
)
.....
create table user39
(
userid bigint (12),
email varchar(256),
........
)
machine3:
user04:
create table user40
(
userid bigint (12),
email varchar(256),
........
)
.....
create table user49
(
userid bigint (12),
email varchar(256),
........
)
user05:
create table user50
(
userid bigint (12),
email varchar(256),
........
)
.....
create table user59
(
userid bigint (12),
email varchar(256),
........
)
第二步,定义数据源与具体逻辑数据库的关系,简单的XML代码如下:
<datasource-config>
<datasource name="user00" value="0">
<property name="driver" value="com.mysql.jdbc.Driver"/>
<property name="url" value="jdbc:mysql://10.224.57.116:3306/user00"/>
<property name="user" value="test"/>
<property name="password" value="pass"/>
</datasource>
...
<datasource name="user02" value="2">
<property name="driver" value="com.mysql.jdbc.Driver"/>
<property name="url" value="jdbc:mysql://10.224.57.117:3306/user03"/>
<property name="user" value="test"/>
<property name="password" value="pass"/>
</datasource>
...
<datasource name="user04" value="4">
<property name="driver" value="com.mysql.jdbc.Driver"/>
<property name="url" value="jdbc:mysql://10.224.57.118:3306/user06"/>
<property name="user" value="test"/>
<property name="password" value="pass"/>
</datasource>
...
</datasource-config>
第三步,根据传入的USERID,进行数据源和表选择,代码逻辑如下:
(1)插入数据:
SQL语句为: insert into user(userid,email) values(1,'aa@sina.com');
插入逻辑:根据userid的value=1进行取模10的值=1,再减一,知道此时插入的数据源为user00,在根据userid末尾两位数据知道表名为user01,此时的SQL语句中表名已经更改,如果使用ibtais书写SQL,那么静态的SQL无法替换成动态的SQL语句,此时有两种做法,一种方法是在ibtais上层实现一套解析层,将SQL解析后并替换再传递给ibatis去执行,另一种方法是改写ibtais的代码,加入SQL解析程序,将SQL解析后并替换再传递给ibatis去执行插入操作,此时的难点在于SQL的语法解析,目前比较著名的淘宝TDDL就是采取第一种的方法,使用javacc去解析SQL语句。本人尝试了下第二种方法即ibatis的改写模式,在此将实现代码分享给大家。
a)在MappedStatement.java中增加下面代码,使用opensource工具JSqlParser:
/**
* add by philip zhong to replace the tables name.2010-12-15
* @param processedSql
* @return
* @throws JSQLParserException
* @throws Exception
*/
private String replaceSql(String processedSql,String replaceTableSuffixKey) throws JSQLParserException
{
CCJSqlParserManager pm = new CCJSqlParserManager();
net.sf.jsqlparser.statement.Statement statement = pm.parse(new StringReader(processedSql));
TablesNamesFinder tablesNamesFinder = new TablesNamesFinder();
List tableList = tablesNamesFinder.getTableList(statement);
String sql=processedSql;
for (int i=0;i<tableList.size();i++)
{
String tempSQL=sql;
String tableName=tableList.get(i).toString().trim();
String repTabName=tableList.get(i).toString().trim()+replaceTableSuffixKey.trim();
sql=tempSQL.replaceAll(tableName,repTabName);
//System.out.println("replaceSql="+sql);
}
return sql;
}
/**
* add by philip zhong to check has lookupkey in parameter object
* @param localSql
* @param map
* @return
*/
private String getTableSuffixKey(Object map)
{
String value = StaticBeanProbe.getObject(map, "lookupkey").toString();
return value;
}
b)再修改IBATIS代码,在MappedStatement.createStatement方法中添加下面代码:
//从传入的parameter中找到表的后缀关键字,例如表:user01,01就是后缀关键字。
String lookupkey=getTableSuffixKey(parameterObject);
//在执行前把sql语句对应的表替换掉,然后再执行
processedSql=replaceSql(processedSql,lookupkey);
c)需要在DAO代码中执行SQL的时间加上以下例子的代码,lookupkey是一个标签:
public long getUseridCount(long userid,String lookupkey) throws DaoException {
(2)查询数据:
SQL语句为: select * from user where userid=12;
查询逻辑:根据userid的value=12进行取模10的值=2,再减一,知道此查询的数据源为user01,在根据userid末尾两位数据知道表名为user12,在经过SQL解析程序替换具体执行的SQL,然后获取SQL执行的结果。
总结:SQL解析模式sharding的精细度较高,在相同的资源下可支持的数据量大,对数据库的资源利用率较高,但实现方式比较复杂,需要实现SQL的语法解析程序,拆分的数量与数据源的配置数量以及表的拆分规则成正比, sharding的精细度到表级别。
至于sharding带来的维护以及异常case,后面blog的会尝试详细阐述。
Tuesday, June 14, 2011
业务数据分布决定了后期的数据架构
作为一名数据架构师,我们早期就应该考虑到业务数据分布的特殊性,如果没有考虑到,将会是致命的。那么我们该如何发现并能够早期解决这样的问题呢?下面我们以具体的案例来介绍说明。
案例一:select * from user where email like 'a%' order by create_time limit 1,20。
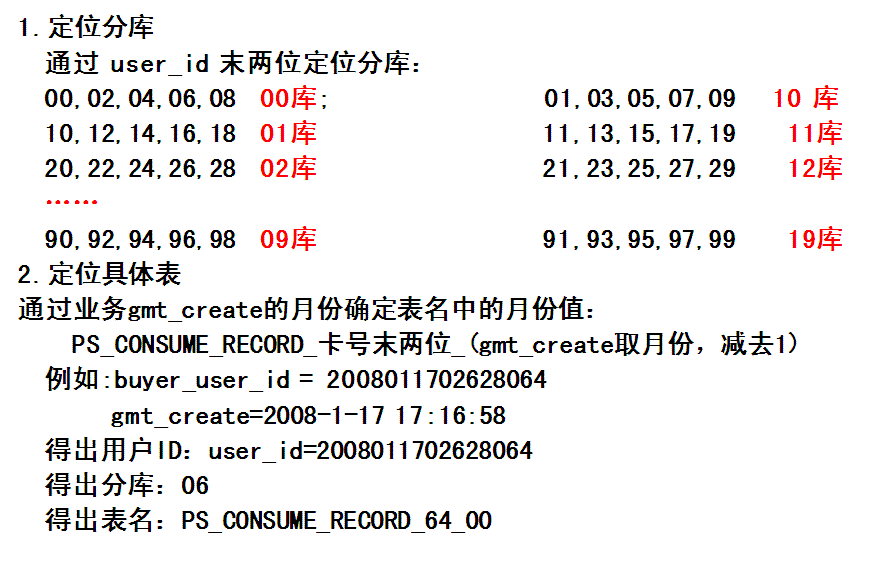
在设计消费记录初始时(支撑每年数据为35亿条),大家都认为已经将消费记录按照用户ID(USERID)取模,分成了100份,然后将按照消费记录的产生的月份在进行一次拆分,100*12=1200张表分布到10-20台的物理的MYSQL数据库中,绝对能够满足所有前台查询。业务数据的拆分规则如下图所示:
大家都认为此时查询应该非常快了,用户怎么爽怎们用;这样的架构设计,不但能够满足后期的业务增长而带来的技术服务能力不匹配问题,而且架构设计也相对简单,已经堪称完美了。但是这样的架构真的是这样吗?
其实不然,由于消费记录中存在大量非商户的卖家用户,当不限制用户查询的时候,普通用户没有问题,当遇到大的卖家用户时,问题出现了:一个大的卖家可能每天产生的消费记录达2万条,一旦这样的用户查询6个月的数据时(2*30*6=120万条数据的获取),无论如何在几秒内是无法完成的,而这样的用户如果取模较多的分布在同一台物理机器上时,并发查询带来的后果,就是运维人员的恐慌和无眠之夜;那么这样的问题,早期是如何规避的呢?
设计一张简单的统计信息表,将这样人群用户前期筛选出来,然后放置到统计信息表中,再将此放置在前端的cache中,这样的表一定是一个小于百万数据的表,当用户查询时,首先访问的是cache中的数据,当发现查询的用户存在于该表中,路由到大卖家系统中,而这个大卖家系统就是根据单个用户最大使用单台物理机器的方法,进行服务的(当然也可根据配置规则路由到不同的物理机器上),这样普通用户的消费记录是一套通用的架构,而特殊大卖家使用的是专用服务器的定制架构。
总结:由于不同的应用系统有此特殊性和共性,作为一名数据架构师,我们不但要找到他们的共性,关键的是我们要找到他们的特殊性,将业务数据的分布特性理清楚,然后再合理规划;一但数据分布问题得以解决,后端使用什么样的数据库以及文件存储对此影响将有限,而你也会享受它们给你带来的成就感。
Thursday, June 9, 2011
The Force.com Multitenant Architecture
Force.com Multitenant 架构的最大亮点在于,将数据索引化,一个存储数据的表,一个用于索引数据的表,再加上一系列存储元数据的表;每次的业务数据的查询首先查找元数据表,然后再改写成具体的查询语句到具体的数据表和索引中进行联合查询,这样SQL语句的执行计划固定,它一定是一个数据表加上一个索引表的join操作,非常适合于OLTP系统,具体的表ER图如下:


上面的说明比较抽象,下面举个具体事例来说明相关技术。假设我们需要根据用户的firstname和lastname来获取某个用户的详细信息,通过Force.com Multitenant 架构,我们如何去做呢?
首先,我们定义元数据信息使用的表。
create table mt_tables
(
tabid int(9) not null,
orgid int(9) not null,
tabname varchar(30) not null,
primary key(tabid)
) ENGINE=InnoDB CHARSET=utf8;
create table mt_fields
(
fieldid int(9) not null,
orgid int(9) not null,
tabid int(9) not null,
fieldname varchar(128) not null,
fieldtype varchar(128) not null,
fieldnum smallint not null,
indextype char(1) not null, -- u:unique or primary index,i-index,n-no index
primary key(fieldid)
) ENGINE=InnoDB CHARSET=utf8;
create index ind_to_mt_fields
on mt_fields
(tabid,orgid);
create unique index ind_uname_mt_tables
on mt_tables
(tabname,orgid);
其次,我们定义存储具体数据需要的表、建立查询索引需要的表和建立数据关系表。
create table mt_data
(
guid varchar(36) not null, -- yyyymmdd+0000000001-9999999999
orgid int(9) not null,
tabid int(9) not null,
name varchar(128) not null,
IsDeleted char(1) not null,
value0 varchar(1000),
...
value20 varchar(1000),
primary key(guid,orgid)
) ENGINE=InnoDB CHARSET=utf8;
create table mt_clobs
(
guid varchar(36) not null, -- yyyymmdd+0000000001-9999999999,refer to mt_data.guid
orgid int(9) not null,
tabid int(9) not null,
value0 text,
...
value10 text,
primary key(guid,orgid)
)ENGINE=InnoDB CHARSET=utf8;
create table mt_indexes
(
guid varchar(36) not null, -- yyyymmdd+0000000001-9999999999,refer to mt_data.guid
orgid int(9) not null,
tabid int(9) not null,
fieldnum smallint not null,
stringvalue varchar(250),
numvalue varchar(40),
datevalue varchar(40),
primary key(guid,orgid,tabid,fieldnum)
)ENGINE=InnoDB CHARSET=utf8;
create index ind_string_mt_indexes
on mt_indexes
(stringvalue,tabid,fieldnum);
create index ind_date_mt_indexes
on mt_indexes
(datevalue,tabid,fieldnum);
create index ind_num_mt_indexes
on mt_indexes
(numvalue,tabid,fieldnum);
create table mt_unique_indexes
(
guid varchar(36) not null, -- yyyymmdd+0000000001-9999999999,refer to mt_data.guid
orgid int(9) not null,
tabid int(9) not null,
fieldnum smallint not null,
stringvalue varchar(224),
numvalue varchar(40),
datevalue varchar(40),
primary key(guid,orgid,tabid,fieldnum)
)ENGINE=InnoDB CHARSET=utf8;
create unique index uk_string_mt_unique_indexes
on mt_unique_indexes
(stringvalue,tabid,fieldnum);
create unique index uk_date_mt_unique_indexes
on mt_unique_indexes
(datevalue,tabid,fieldnum);
create unique index ind_num_mt_unique_indexes
on mt_unique_indexes
(numvalue,tabid,fieldnum);
create table mt_relationships
(
relationid varchar(36) not null, -- yyyymmdd+0000000001-9999999999
guid varchar(36) not null, -- yyyymmdd+0000000001-9999999999,refer to mt_data.guid
orgid int(9) not null,
tabid int(9) not null,
targetTabid int(9) not null,
primary key(relationid,orgid,tabid,targetTabid)
)ENGINE=InnoDB CHARSET=utf8;
第三步,我们开始建立元数据与存储数据的关系,插入的数据为用户表数据,此时的用户表是一个逻辑上的表,存在于mt_tables中。
insert into mt_tables(tabid,orgid,tabname,createtime,modifytime)
values(1,1,'USER',sysdate(),sysdate());
commit;
set @tablid=1;
insert into mt_fields(fieldid,orgid,tabid,fieldname,fieldtype,fieldnum,indextype,createtime,modifytime)
values
(1,1,@tablid,'USERID','VARCHAR',0,'u',sysdate(),sysdate());
insert into mt_fields(fieldid,orgid,tabid,fieldname,fieldtype,fieldnum,indextype,createtime,modifytime)
values
(2,1,@tablid,'USERNAME','VARCHAR',1,'i',sysdate(),sysdate());
....
insert into mt_fields(fieldid,orgid,tabid,fieldname,fieldtype,fieldnum,indextype,createtime,modifytime)
values
(5,1,@tablid,'FIRST_NAME','VARCHAR',4,'n',sysdate(),sysdate());
...
insert into mt_fields(fieldid,orgid,tabid,fieldname,fieldtype,fieldnum,indextype,createtime,modifytime)
values
(7,1,@tablid,'LAST_NAME','VARCHAR',6,'n',sysdate(),sysdate());
commit;
第四步,在应用程序创建用户数据的时候根据元数据表信息,建立mt_data,mt_clobs,mt_indexes等相关表的关系数据。
最后,我们看下如何根据firstname和lastname获取用户的信息,SQL语句如下:
SELECT b.value0,value1,value2,value3,value4,value5,value6
FROM mt_data b,
(SELECT guid, orgid
FROM mt_indexes a
WHERE a.stringvalue = 'philip'
AND a.tabid = 1
AND a.fieldnum = 4
) c
WHERE c.guid = b.guid
AND c.orgid = b.orgid
AND value6 = 'zhong'
整套架构的优点:
类似与oracle的数据字典+索引的机制,实现了一套通用的数据查询体制,与类似的行存储列方式的通用解决方案,数据的冗余程度很小,数据量也不会成倍增加,加上上层orgid的sharding,单个schema存储的数据量将不会很大,也能满足web应用的可扩展性,适用于MYSQL数据库,SQL执行计划非常固定。
缺点:
所有的SQL查询将是固定模式的join查询,但如果本身应用涉及的表join过多,那么查询的速度将下降,可以通过表的冗余措施降低表的jion复杂度。此外唯一性数据的查询速度有所降低。
下面是针对该架构在mysql5.1.55上进行的一些性能测试数据:
Case 1:
MYSQL------ mt_data records= 9000415 ,
mt_index records =9000415,
Case 2:
MYSQL------ mt_data records= 5000415,
mt_index records =5000415
Case 3:
MYSQL------ mt_data records= 1000305,
mt_index1 records =1000305
Case 4:
MYSQL------ mt_data records= 36630,
mt_index1 records =36630
Case name | MYSQL force.com SQL query |
Case 1 | 55 ms |
Case 2 | 40 ms |
Case 3 | 42 ms |
Case 4 | 38 ms |
Wednesday, March 2, 2011
Oracle10.2.0.4 replicate to mysql5.1
First, we install the oracle database gateway(11g,DG4ODBC) on oracle DB server,we can download from oracle company and get the install document from oracle metalink;
Second,we install unixodbc and mysqlodbc on the oracle DB server.
Thirdly,we configure the ODBC and DG4ODBC.
thirdly, we create trrigers on all tables and create a table to save the replication data.
the trigger code example as following:
CREATE OR REPLACE TRIGGER tr_repl_test_repl_mysql
AFTER INSERT OR UPDATE OR DELETE
ON test_repl_mysql
FOR EACH ROW
DECLARE
v_errm VARCHAR2 (512);
v_dml_type VARCHAR2 (16);
v_bind_where_str VARCHAR2(2000);
v_unique_where_str VARCHAR2(2000);
v_unique_where_str2 VARCHAR2(2000);
v_table_name VARCHAR2 (30);
PROCEDURE sp_insert_data (
p_table_name VARCHAR2,
p_dml_type VARCHAR2,
p_unique_where_str VARCHAR2,
p_bind_where_str VARCHAR2
)AS
v_id VARCHAR2 (18);
v_seq NUMBER;
BEGIN
SELECT seq_repl_channel.NEXTVAL
INTO v_seq
FROM DUAL;
v_id := TO_CHAR (SYSDATE, 'yyyymmdd') || LPAD (v_seq, 10, 0);
EXECUTE IMMEDIATE 'INSERT INTO repl_channel(ID,table_name, dml_type,unique_where_str, bind_where_str,status,modify_time,create_time)
VALUES(:1,:2,:3,:4,:5,:6,:7,:8)'
USING v_id,p_table_name,
p_dml_type,p_unique_where_str,
p_bind_where_str,'I',
SYSTIMESTAMP,SYSTIMESTAMP;
END sp_insert_data;
BEGIN
v_bind_where_str:=' id=? ';
v_table_name := 'test_repl_mysql';
IF INSERTING
THEN
v_dml_type := 'INSERTING';
v_unique_where_str := ' id='||:new.id||'';
sp_insert_data (v_table_name,
v_dml_type,v_unique_where_str,v_bind_where_str);
ELSIF UPDATING
THEN
v_dml_type := 'UPDATING';
v_unique_where_str := ' id='||:old.id||'';
v_unique_where_str2 := ' id='||:new.id||'';
IF ( :old.siteid <>:new.siteid )
THEN
sp_insert_data (v_table_name,
'DELETING',v_unique_where_str,v_bind_where_str);
sp_insert_data (v_table_name,
'INSERTING',v_unique_where_str2,v_bind_where_str);
ELSE
sp_insert_data (v_table_name,
v_dml_type,v_unique_where_str,v_bind_where_str);
END IF;
ELSIF DELETING
THEN
v_dml_type := 'DELETING';
v_unique_where_str := ' id='||:old.id||'';
sp_insert_data (v_table_name,
v_dml_type,v_unique_where_str,v_bind_where_str);
END IF;
EXCEPTION WHEN OTHERS THEN
v_errm := SUBSTR (SQLERRM, 1, 512);
INSERT INTO repl_log
(ID,err_msg, create_time)
VALUES (seq_wbx_repl_log.NEXTVAL,v_errm, SYSTIMESTAMP);
END tr_repl_test_repl_mysql;
/
Finally, we use a java damon to execute the the middle table replication data by status.
Build oracle repliacte mysql environment and give the testing report as following:

The design architecture as following:
